一.概念理解
闪屏页
1.当点击app开始的一瞬间,所呈现出来的页面就是闪屏页。
2.为什么会有闪屏也,由于app启动需要加载代码,这个过程需要耗时,在没有加载完成之前,是看不到app真正的页面。所以app在没有完全加载完时,系统会默认显示一个页面。
3.通常这个闪屏页如果没有进行配置,能看到的就是白屏页或黑屏页。另外在闪屏页期间程序是无法控制的,所以在这个阶段所看到的页面都是静态页面。
启动页
1.启动页是在闪屏页之后,app真正加载完成了。这个时候程序是可控制的,一般用于广告图的展示,或者引导图的展示。
2.启动页也不是必须的,如果不加启动页,就直接显示首页了。
二.显示方式
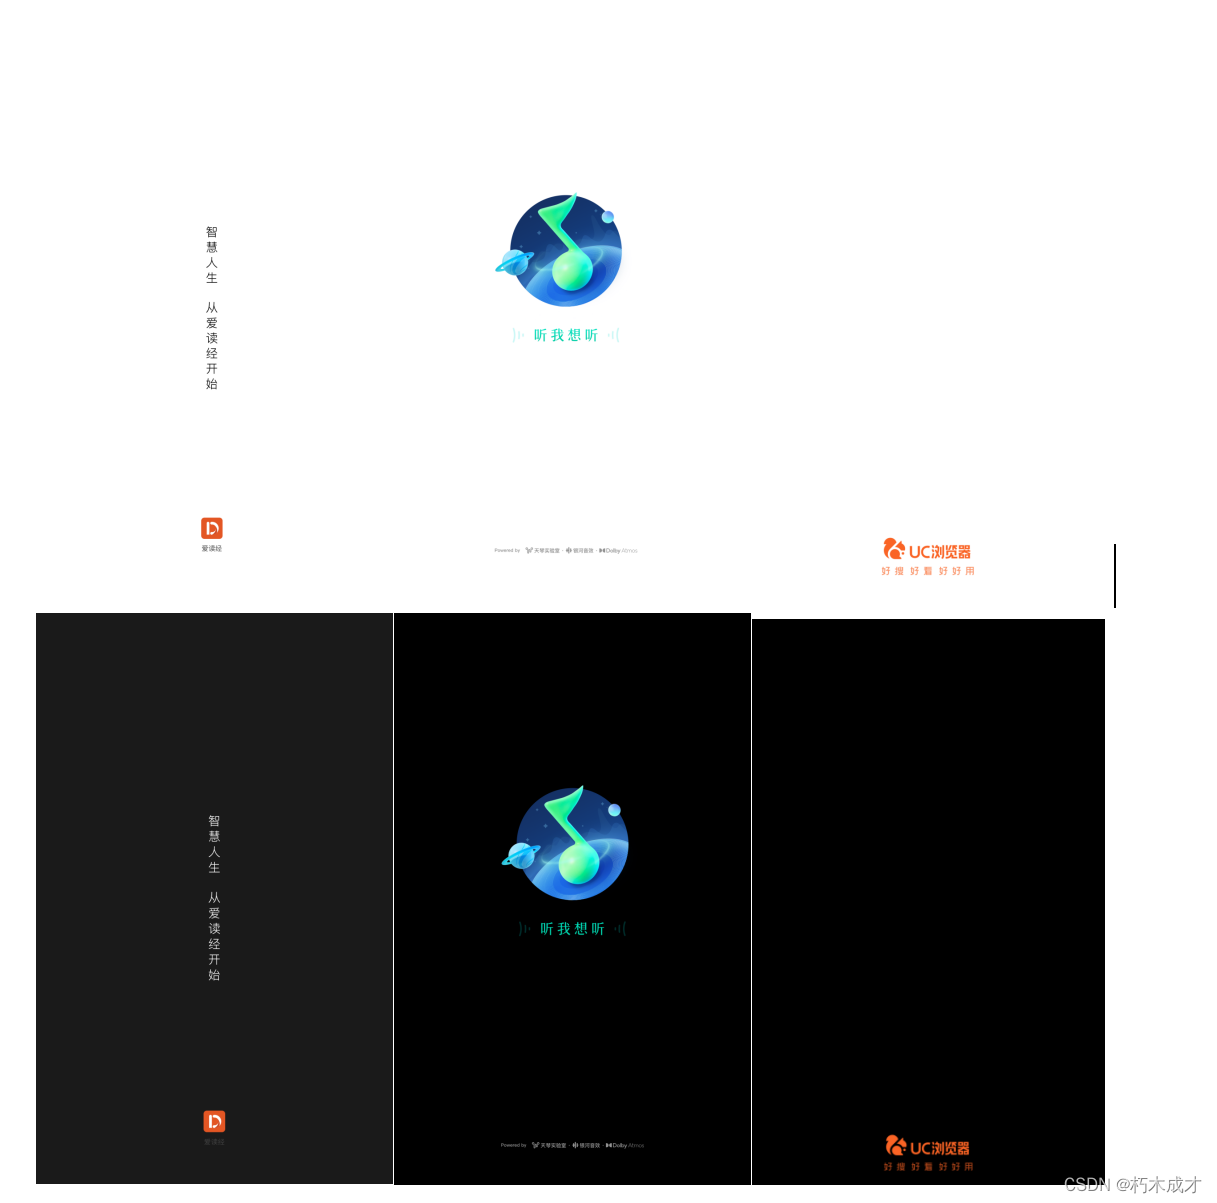
1.闪屏页
主流app展示方式如下:分别是在默认模式和深色模式下的呈现方式
 上边页面配置拆解:
上边展示的页面就是闪屏页,主要分为两个部分,背景色+前景图
背景色:一般都为单色,可根据系统主题适配,比如深色模式。
前景图:一般都为logo图标+文字。图片是分开展示的,分为上中下,可适当配置。
为什么要这样配置:程序推荐的方式,适配率比较高,比如说安卓大部分机型都能适配。
不推荐直接展示一整张图片
更多内容可看一下文章:https://zhuanlan.zhihu.com/p/342038493
如下图:这是在大屏端(pad)的呈现方式,很明显图片被裁减缺失了一部分。
图片为什么被裁减了:由于图片是整个屏幕显示,需要适配不同机型,会对图片进行等比例缩放,超出的部分会被裁减。
这就是为什么不推荐显示一整张图的原因,有没有解决的办法呢,简单来说可以在做图片的时候,主要的内容信息不要显示在图片的边缘。这样即使被裁减了,也不会丢失图片主要信息,看起来图片还是完整的。

3.启动页如下图
 上边图片就是启动页的展示方式:启动页一般是广告推广和进行用户引导。另外还能起到预加载的作用,比如项目功能多,上来就需要加载很多模块,如果不加个启动页,用户等待的时候过长,体验不好。当然也可以不加启动页,直接显示首页。
三.闪屏页配置
android_37">1.android端配置
在项目res中drawable目录中创建splash.xml如下:
<?xml version="1.0" encoding="utf-8"?>
<layer-list xmlns:android="http://schemas.android.com/apk/res/android">
    <!--闪屏页背景色-->
    <item>
        <shape>
            <solid android:color="@color/color_FFFFFF" />
        </shape>
    </item>
    <!--中间前景图-->
    <item>
        <bitmap
            android:tint="@color/color_title_bar"
            android:gravity="center"
            android:src="@drawable/ic_splash_center" />

    </item>
    <!--底部前景图-->
    <item android:bottom="@dimen/space_70">
        <bitmap
            android:gravity="bottom"
            android:src="@drawable/ic_splash_bottom" />
    </item>

</layer-list>
最后在主题中引入:
    <style name="welcomeTheme" parent="AppTheme">

        <item name="android:windowBackground">@drawable/splash</item>
    </style>
这是安卓通用的配置方式,不过这里还有个问题。
android 12上的闪屏页配置
主题配置如下:
implementation "androidx.core:core-splashscreen:1.0.0-beta02"
<?xml version="1.0" encoding="utf-8"?>
<resources>
<style name="Theme.App" parent="@android:style/Theme.NoTitleBar.Fullscreen">
<item name="android:statusBarColor">:color/transparent</item>
<item name="android:navigationBarColor">:color/transparent</item>
<item name="android:windowDrawsSystemBarBackgrounds">true</item>
</style>
<style name="LaunchTheme" parent="Theme.SplashScreen">
<item name="windowSplashScreenBackground">/splashScreenBackground</item>
<item name="windowSplashScreenAnimatedIcon">/splashscreen_icon</item>
<item name="windowSplashScreenAnimationDuration">2000</item>
<item name="postSplashScreenTheme">/Theme.App</item>
</style>
<style name="NormalTheme" parent="@android:style/Theme.Light.NoTitleBar">
<item name="android:windowBackground">?android:colorBackground</item>
</style>
</resources>
splashscreen_icon文件如下:是个小动画
<animated-vector xmlns:android="http://schemas.android.com/apk/res/android"
    xmlns:aapt="http://schemas.android.com/aapt">
  <aapt:attr name="android:drawable">
    <vector
        android:width="108dp"
        android:height="108dp"
        android:viewportHeight="432"
        android:viewportWidth="432">
      <!--
       Scale down the icon and translate if to fit
       within the inner 2/3 (scale <= 0.67) or the viewport.
      -->
      <group
          android:translateX="97"
          android:translateY="97"
          android:scaleX="0.55"
          android:scaleY="0.55">
        <clip-path android:pathData="m322.02,167.89c12.141,-21.437 25.117,-42.497 36.765,-64.158 2.2993,-7.7566 -9.5332,-12.802 -13.555,-5.7796 -12.206,21.045 -24.375,42.112 -36.567,63.166 -57.901,-26.337 -127.00,-26.337 -184.90,0.0 -12.685,-21.446 -24.606,-43.441 -37.743,-64.562 -5.6074,-5.8390 -15.861,1.9202 -11.747,8.8889 12.030,20.823 24.092,41.629 36.134,62.446C47.866,200.90 5.0987,267.15 0.0,337.5c144.00,0.0 288.00,0.0 432.0,0.0C426.74,267.06 384.46,201.32 322.02,167.89ZM116.66,276.03c-13.076,0.58968 -22.531,-15.277 -15.773,-26.469 5.7191,-11.755 24.196,-12.482 30.824,-1.2128 7.8705,11.451 -1.1102,28.027 -15.051,27.682zM315.55,276.03c-13.076,0.58968 -22.531,-15.277 -15.773,-26.469 5.7191,-11.755 24.196,-12.482 30.824,-1.2128 7.8705,11.451 -1.1097,28.027 -15.051,27.682z" />
        <path
            android:fillColor="#3ddc84"
            android:pathData="m322.02,167.89c12.141,-21.437 25.117,-42.497 36.765,-64.158 2.2993,-7.7566 -9.5332,-12.802 -13.555,-5.7796 -12.206,21.045 -24.375,42.112 -36.567,63.166 -57.901,-26.337 -127.00,-26.337 -184.90,0.0 -12.685,-21.446 -24.606,-43.441 -37.743,-64.562 -5.6074,-5.8390 -15.861,1.9202 -11.747,8.8889 12.030,20.823 24.092,41.629 36.134,62.446C47.866,200.90 5.0987,267.15 0.0,337.5c144.00,0.0 288.00,0.0 432.0,0.0C426.74,267.06 384.46,201.32 322.02,167.89ZM116.66,276.03c-13.076,0.58968 -22.531,-15.277 -15.773,-26.469 5.7191,-11.755 24.196,-12.482 30.824,-1.2128 7.8705,11.451 -1.1102,28.027 -15.051,27.682zM315.55,276.03c-13.076,0.58968 -22.531,-15.277 -15.773,-26.469 5.7191,-11.755 24.196,-12.482 30.824,-1.2128 7.8705,11.451 -1.1097,28.027 -15.051,27.682z"
            android:strokeWidth="1.93078" />
        <group android:name="anim">
          <path
              android:fillAlpha="0.999"
              android:fillColor="#979797"
              android:fillType="nonZero"
              android:pathData="m-197.42,638.59c0.0,0.0 -5.9627,-259.30 46.113,-215.87 32.895,27.437 76.838,-65.597 91.553,-46.592 2.7119,-7.7182 95.045,109.16 139.74,17.953 10.678,-21.792 43.788,-64.489 78.236,-16.164 54.226,76.069 110.90,-100.75 179.84,-17.966 36.393,43.701 96.377,-23.605 148.05,19.889 42.614,35.869 83.166,3.7255 109.76,61.101 24.321,52.465 35.893,197.64 35.893,197.64L631.77,92.867L-197.42,92.867Z"
              android:strokeAlpha="1"
              android:strokeColor="#00000000"
              android:strokeWidth="12" />
        </group>
      </group>
    </vector>
  </aapt:attr>

  <target android:name="anim">
    <aapt:attr name="android:animation">
      <objectAnimator
          android:duration="1000"
          android:propertyName="translateY"
          android:repeatCount="0"
          android:valueFrom="0"
          android:valueTo="-432"
          android:valueType="floatType"
          android:interpolator="@android:interpolator/accelerate_decelerate" />
    </aapt:attr>
  </target>
  <target android:name="anim">
    <aapt:attr name="android:animation">
      <objectAnimator
          android:duration="500"
          android:propertyName="translateX"
          android:repeatCount="-1"
          android:repeatMode="reverse"
          android:valueFrom="-162"
          android:valueTo="162"
          android:valueType="floatType"
          android:interpolator="@android:interpolator/accelerate_decelerate" />
    </aapt:attr>
  </target>
</animated-vector>
在AndroidManifest中引用
        <activity
            android:name=".MainActivity"
            android:exported="true"
            android:launchMode="singleTop"
            android:theme="@style/LaunchTheme"
            android:configChanges="orientation|keyboardHidden|keyboard|screenSize|smallestScreenSize|locale|layoutDirection|fontScale|screenLayout|density|uiMode"
            android:hardwareAccelerated="true"
            android:windowSoftInputMode="adjustResize">
            <!-- Specifies an Android theme to apply to this Activity as soon as
                 the Android process has started. This theme is visible to the user
                 while the Flutter UI initializes. After that, this theme continues
                 to determine the Window background behind the Flutter UI. -->
            <meta-data
                android:name="io.flutter.embedding.android.NormalTheme"
                android:resource="@style/NormalTheme"
                />
            <intent-filter>
                <action android:name="android.intent.action.MAIN"/>
                <category android:name="android.intent.category.LAUNCHER"/>
            </intent-filter>
        </activity>
ios_206">2.ios端配置
关于ios端的配置,比较简单,利用Xcode工具,不需要写代码。
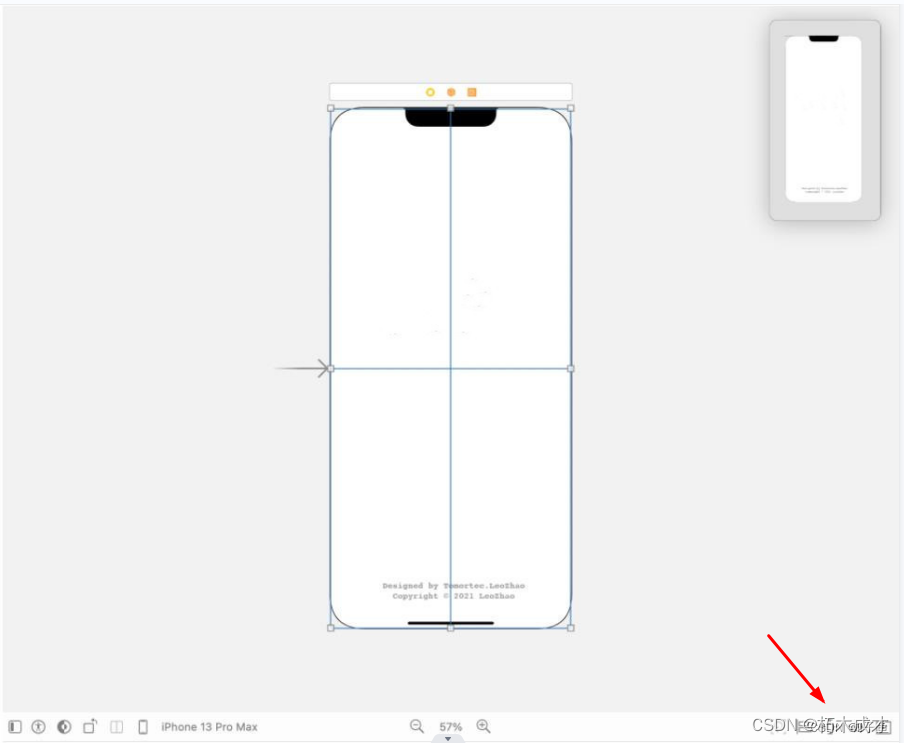
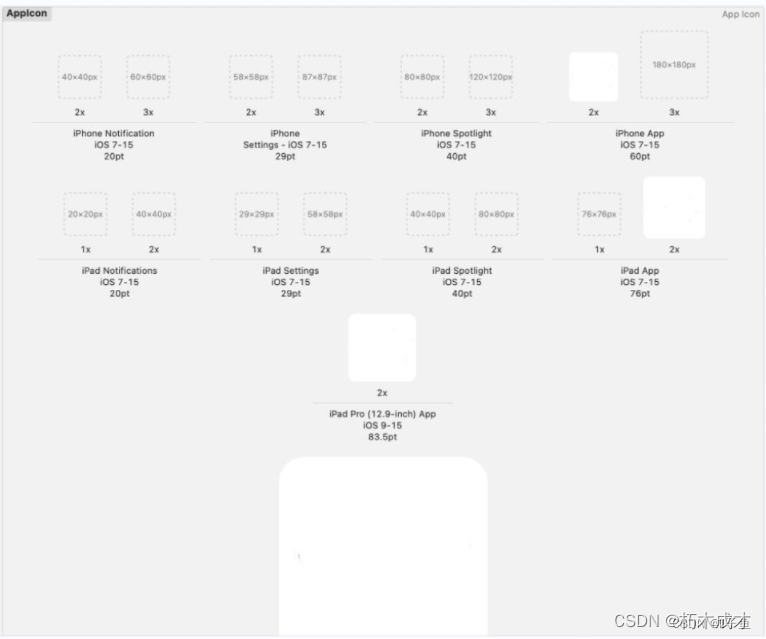
设置图标(Icon)
打开 Assets.xcassets,将项目结构中的图片拉入 AppIcon 中的相应位置,如下图所示。最后,在你的 xcodeproj 中将 App Icons Source 设为 AppIcon,接下来重新 Build 即可。
设置启动页面(Launch Screen)
在我当前的 Xcode 版本(13.0)中,要设置启动页面需要有 Launch Screen File,事实上,这个文件可以使用 .storyboard。
我们在项目中创建 .storyboard文件,我将其命名为 “Launch Screen.storyboard”。
打开我们的 storyboard,然后在里面设计即可。
最后,在我们的 xcodeproj 中将 Launch Screen File 设置为 “Launch Screen.storyboard”。
这样就完成了。