小程序>微信小程序项目实例——我有一支画笔(画画)
项目代码见文字底部,点赞关注有惊喜
一、项目展示
我有一支画笔是一款绘图小程序
用户可以在白板上自由画画,也可以选择一张本地的照片,在照片上画画
用户可以自由修改画笔宽度、颜色,同时绘画可以保存到本地
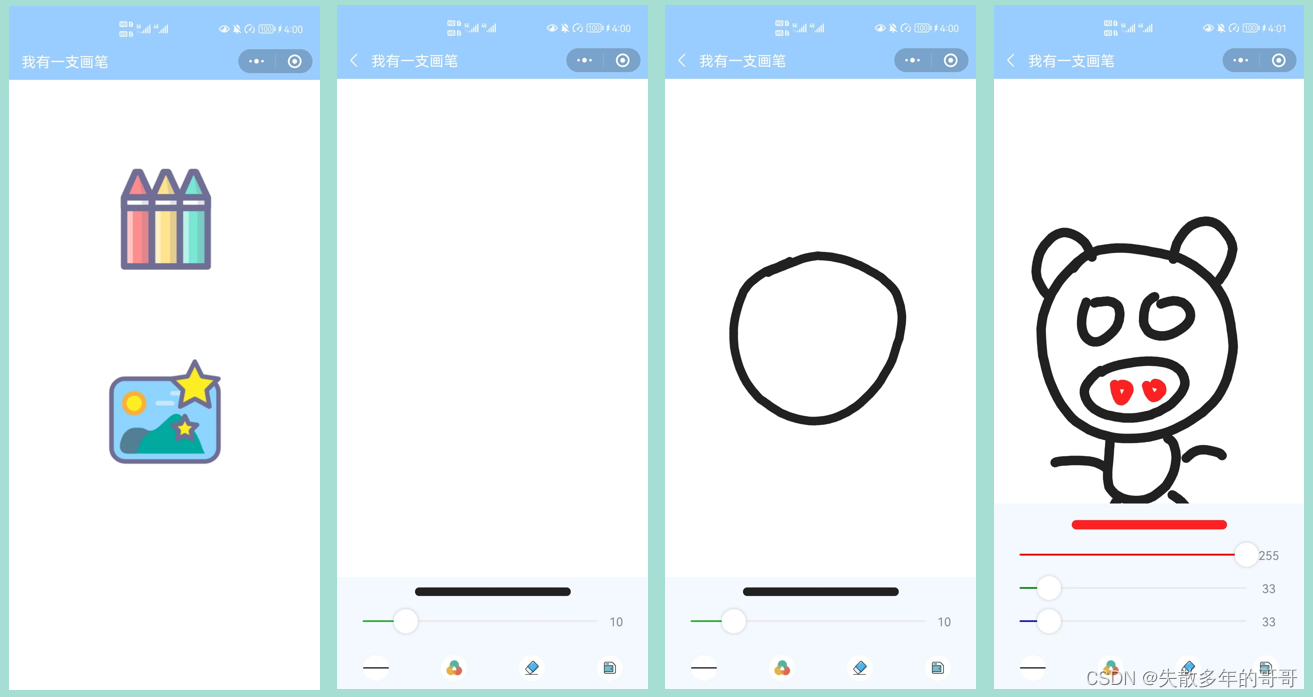

二、首页
首页由两张图片构成
代表自由绘图和照片绘图两个功能
用户点击选择不同功能
<!--index.wxml-->
<view class="painting" bindtap="toPainting">
  <image src="../../images/paint3.png" mode="aspectFit"/>
</view>

<view class="painting2" bindtap="toPainting2">
  <image src="../../images/paint2.png" mode="aspectFit"/>
</view>
/**index.wxss**/
page{
  width: 100%;
  height: auto;
  display: flex;
  flex-direction: column;
  align-items: center;
}

.painting{
  display: flex;
  flex-direction: column;
  align-items: center;
  justify-content: center;
  margin-top: 100px;
  width: 260rpx;
  height: 260rpx;
  /* background-color: red; */
}

.painting2{
  display: flex;
  flex-direction: column;
  align-items: center;
  justify-content: center;
  margin-top: 100px;
  width: 260rpx;
  height: 260rpx;
  /* background-color: red; */
}
首页效果如下:

三、自由绘图
用户可以在空白页面上进行绘图
用户可以调整画笔粗细,画笔颜色
也可以使用橡皮擦来擦除
最后可以将画好的图保存到本地
下面仅展示UI界面代码
<!--painting.wxml-->
<canvas canvas-id="myCanvas" style="height: calc(100vh - {{canvasHeight}}px)" disable-scroll="true" bindtouchend="toucheEnd" bindtouchstart="touchStart" bindtouchmove="touchMove"/>
<view class="bottom">
  <block wx:for="{{btnInfo}}" wx:key="{{index}}">
    <view class="list-item" data-type="{{item.type}}" style="background: {{item.background}}" bindtap="tapBtn"></view>
  </block>
</view>
<view class="choose-box" wx:if="{{width}}">
<view class="color-box" style="background: {{'rgb(' + r + ', ' + g + ', ' + b + ')'}}; height: {{w}}px; border-radius: {{w/2}}px"></view>
  <slider min="1" max="50" step="1" show-value="true" value="{{w}}" bindchange="changeWidth"/>
</view>
<view class="choose-box" wx:if="{{color}}">
  <view class="color-box" style="background: {{'rgb(' + r + ', ' + g + ', ' + b + ')'}}; height: {{w}}px; border-radius: {{w/2}}px"></view>
  <slider min="0" max="255" step="1" show-value="true" activeColor="red" value="{{r}}" data-color="r" bindchange="changeColor"/>
  <slider min="0" max="255" step="1" show-value="true" activeColor="green" value="{{g}}" data-color="g" bindchange="changeColor"/>
  <slider min="0" max="255" step="1" show-value="true" activeColor="blue" value="{{b}}" data-color="b" bindchange="changeColor"/>
</view>
<view class="choose-box-flex" wx:if="{{clear}}">
  <view class="choose-item" bindtap="chooseEraser">
    <view class="choose-img" style='background: url("https://s1.ax1x.com/2022/05/25/XkppBF.png") white no-repeat; background-size: 26px 26px;background-position: 2px 2px; border: {{eraser ? "2px solid red" : "2px solid transparent"}}'></view>
    <view>橡皮擦</view>
  </view>
  <view class="choose-item" bindtap="clearCanvas">
    <view class="choose-img" style='background: url("https://s1.ax1x.com/2022/05/25/XkpDCn.png") white no-repeat; background-size: 26px 26px;background-position: 2px 2px;'></view>
    <view>清空</view>
  </view>
</view>
/* painting.wxss */
page {
  background: rgba(153, 204, 255, 0.1);
}

canvas {
  width: 100vw;
}

.bottom {
  width: 100vw;
  height: 50px;
  position: absolute;
  bottom: 0;
  display: flex;
  justify-content: space-around;
}

.list-item {
  width: 30px;
  height: 30px;
  margin: 10px 0;
  border-radius: 50%;
}

.choose-box {
  width: 100vw;
  position: absolute;
  bottom: 50px;
}

.color-box {
  width: 50vw;
  margin: 20px auto;
}

slider {
  margin: 20px 30px;
}

.choose-box-flex {
  display: flex;
  justify-content: space-around;
  width: 100vw;
  position: absolute;
  bottom: 50px;
  font-size: 16px;
  color: #666;
  text-align: center;
}
.choose-img {
  width: 30px;
  height: 30px;
  margin: 10px;

  border-radius: 50%;
  background: white;
}
下面我将给大家演示一下我的室友!!!
(喜欢我室友的可以私信我,送微信号!!!)

四、照片绘图
用户可以选择一张照片
在照片的基础上进行绘画
其余功能和自由绘画一致
下面仅展示UI界面代码
<!--painting-2.wxml-->
<canvas canvas-id="myCanvas" disable-scroll="true" bindtouchstart="touchStart"
  bindtouchmove="touchMove" bindtouchend="touchEnd" wx:if="{{hasChoosedImg}}"
  style="height: {{(canvasHeightLen == 0) ? canvasHeight : canvasHeightLen}}px; width: {{canvasWidth}}px;"
/>
<view class="failText" wx:if="{{!hasChoosedImg}}" click="">没有选择照片,点击重新选择</view>
<view class="bottom">
  <block wx:for="{{btnInfo}}" wx:key="{{index}}">
    <view class="list-item" data-type="{{item.type}}" style="background: {{item.background}}" bindtap="tapBtn"></view>
  </block>
</view>
<view class="choose-box" wx:if="{{width}}">
<view class="color-box" style="background: {{'rgb(' + r + ', ' + g + ', ' + b + ')'}}; height: {{w}}px; border-radius: {{w/2}}px"></view>
  <slider min="1" max="50" step="1" show-value="true" value="{{w}}" bindchange="changeWidth"/>
</view>
<view class="choose-box" wx:if="{{color}}">
  <view class="color-box" style="background: {{'rgb(' + r + ', ' + g + ', ' + b + ')'}}; height: {{w}}px; border-radius: {{w/2}}px"></view>
  <slider min="0" max="255" step="1" show-value="true" activeColor="red" value="{{r}}" data-color="r" bindchange="changeColor"/>
  <slider min="0" max="255" step="1" show-value="true" activeColor="green" value="{{g}}" data-color="g" bindchange="changeColor"/>
  <slider min="0" max="255" step="1" show-value="true" activeColor="blue" value="{{b}}" data-color="b" bindchange="changeColor"/>
</view>
/* painting-2.wxss */
page {
  background: rgba(153, 204, 255, 0.1);
}

.failText {
  margin-top: 100px;
  text-align: center;
  color: #888;
}

.bottom {
  width: 100vw;
  height: 50px;
  position: absolute;
  bottom: 0;
  display: flex;
  justify-content: space-around;
}

.list-item {
  width: 30px;
  height: 30px;
  margin: 10px 0;
  border-radius: 50%;
}

.choose-box {
  width: 100vw;
  position: absolute;
  bottom: 50px;
}

.color-box {
  width: 50vw;
  margin: 20px auto;
}

slider {
  margin: 20px 30px;
}

.choose-box-flex {
  display: flex;
  justify-content: space-around;
  width: 100vw;
  position: absolute;
  bottom: 50px;
  font-size: 16px;
  color: #666;
  text-align: center;
}
.choose-img {
  width: 30px;
  height: 30px;
  margin: 10px;

  border-radius: 50%;
  background: white;
}
下面我将画我的室友2号!!
我的室友2号是校草!!!
中意的请私信我发他微信号!

文末
具体的介绍就到这里了
小程序有时候会卡顿一下但是不多
有兴趣的同学可以继续研究
代码放到下面链接里了
点击下载 小程序


![[408] cache与主存的映射部分概念](https://img-blog.csdnimg.cn/d5e3271062da45af9df534e7ffed88c9.png#pic_center)